PARIGHASANA = GATE POSE
This elegant yoga pose opens the hips, improves breathing, and more. Try it during your yoga practice.
Pronounced: /PARE—eee—GAHZ—ah—nah/
“Parigha” refers to the iron bar or latch that is used to shut or lock a gate. During this pose, your body resembles that cross beam and latch.
Pose Level: 1
Physical Description, How-To:
- Begin by kneeling on both knees, hands on your waist. Be sure to press down your shins, ankles, the tops of your feet, and toes into the floor. Feet and toes should be pointing straight back.
- Start with some preparation. Lift your RIGHT knee, coming to what looks like a “proposal” pose, with your foot planted in front of you. Then move your right foot to the right side (in line with the left knee), with the right knee pointing out; knee is above the ankle. The right knee should form a 90-degree angle, like in Virabhadrasana II (Warrior 2 Pose). Be sure to keep the trunk straight and tuck the buttocks in and slightly down; this protects the lower back. Make sure the left knee and left thigh bearing the weight are perpendicular to the floor and naturally in line with the torso (that thigh and knee should not be splaying to either side). The heel of your right foot is aligned with your left knee. Return to the starting kneeling position, then repeat this action on the LEFT side.
- Return to the RIGHT side. Press into the floor with your shins, feet, and toes, and tuck your buttocks in and down, while keeping the trunk straight. Without disturbing your level buttocks, extend your right leg straight out to the side, in line with the right hip; your right heel is in line with your left knee. Your right kneecap is tight, but the knee is not locked or overextended; that kneecap should be pointing towards the ceiling (to assist with this motion, mindfully engage your INNER THIGH; do not force it by merely flapping your right foot). Your right foot is flexed, with toes pointing to the ceiling (the shin and toes on the kneeling side are still pressing into the floor). INHALE while extending your arms up and out to both sides, at shoulder level. Your palms face downwards. Fingertips point in opposite directions, helping you widen the chest. Learn to keep your chest open and shoulder blades back while your arms are spread; lift through the crown of your head. Return to starting kneeling position, then repeat this action on the LEFT side.
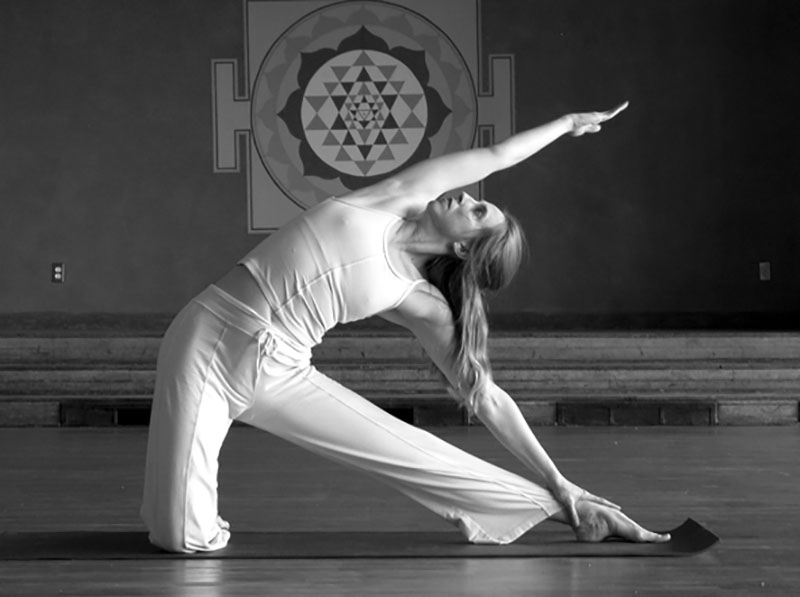
- Now, complete the full posture. Again, ensure the kneeling knee and thigh are directly below that hip, so perpendicular to the floor. On the RIGHT side, fully extend the right leg to the right. INHALE, and bring both arms extended to the sides at the height of the shoulders. Your right heel should be in line with your left knee. In the classic pose (pictured here) the sole of the foot plants down on the ground; you can also flex those toes to the ceiling while pressing the heel into the floor. Bring the left hand to the left hip. EXHALE, with the chest and the abdomen facing forward, bend the trunk to the right at the hip crease, bringing it to the right side, towards the extended leg. Lengthen the right arm towards that foot and place the right hand on the right shinbone.
- EXHALE, extend the left arm over your head in line with your left ear.
- With each exhale, bend as far as you can to the right, as long as you keep the openness in the front of the chest; rolling your shoulders back helps with this action. Your torso tends to move forward and down towards the floor; keeping hips aligned, turn the torso upwards, towards the ceiling. If it is comfortable, look up slightly.
- To come up and out, take the left arm to the waist, and slowly and with awareness, left the trunk and come up.
- Now, repeat these steps (#4 through 7) on the LEFT side.
Remember, Where should my awareness be?: Stability in the lower body is especially important; it grounds you so that you can get a good flex in the spine, hips, and sides. The thigh of the leg with the bent knee should remain perpendicular to the floor; do not allow it to splay to either side. Be sure not to lock the knee of the extended leg. Once you extend and stretch to the side, your torso tends to fall and curve forward; keep your torso lifted, shoulders back and down your back, and chest opened widely.
Modifications, How can I make it easier and more comfortable?:
- Change the foot position
- Use a block or blankets
- Use a wall
- Use a chair
 It is crucial your modify every yoga pose to fit the needs, stability, and comfort of your body. The foot of the extended leg can point to the ceiling (this often helps beginners with balance and alignment) or the sole of the foot can come to the floor, with the toes pointing outwards, in line with the leg. If you feel discomfort or slight pain in the knee of the extended leg, pointing your toes and bringing the sole of the foot to the floor may help. When attempting to flatten that foot to the floor, if it does not go all the way down, use a folded blanket or block under the sole of your foot. If you want to point the toes upwards, but this is difficult, work against a wall and press that foot into the wall. If your bent knee is uncomfortable on the hard floor, you can put a blanket under that knee. If knee issues make it impossible to kneel, Parighasana can be done from a chair (see photo above). Sit with your buttock of the leg with the bent knee on the side of the chair; the thigh and knee should be pointed forward. The other buttock comes off of the chair, as that leg extends at a right angle from the bent thigh.
 Benefits, Why should I do this pose?: This is a wonderful hip opener. Because it is a lateral stretch, practicing Parighasana can remove cramping in the area of the floating and “false” ribs. It can assist relieving pain from some backaches. It helps tone the abdominal muscles and organs, and keeps abdominal skin taut. Stretching the intercostal muscles (these connect your ribs), the side movements of Parighasana make room for your lungs to expand, thereby improving your breathing practices. For this reason, this posture is sometimes recommended for those with asthma, the flu, a cold, or other respiratory problems.
Contraindications, What precautions should I take, or when should I not do this pose?: If kneeling and bearing weight on your bent knee is painful, do the modified posture (described above) in a chair, or try other side stretches such as the Kripalu version of beginners’ Ardha Chandrasana (Half Moon Pose). Practice the version that begins in Tadasana and then, while remaining standing on both legs, focuses on lateral stretching. Parshvakonasana (bent knee side stretch and lateral angle) is another option that provides a wonderful full body lateral stretch. Alternate hip openers that do not bear weight on the knee include Ananda Balasana (Happy Baby Pose) and Kapotasana (Pigeon Pose). If you have neck issues, keeping the gaze forward rather than looking up might be beneficial.
Role in overall Sādhanā Practice, How will this help me improve?: This posture helps you prepare for USTRASANA (Camel Pose) and, later, advanced back bends. It improves both TRIKONASANA (Triangle Pose) and PARSVAKONASANA (Side Stretch).
 Taking it further, How can I deepen my pose?: The posture described above is for beginners and intermediate yoga practitioners. For the full expression of Parighasana, go deeper into the side bend: The entire forearm on the side of the extended leg comes to the shin and ankle and that ear rests on that upper arm, while the other arm (reaching upwards in the beginners’ version described above) comes all the way over the head and meets the palms of the other hand. The ear on that side now touches the upper arm on that side. The hands, at this point now touching, will be near the extended ankle or resting on the extended foot. Be sure to keep the chest rotated upwards as much as possible.
 History and Symbolism, What are some fun facts about this pose?: The name of this pose comes from the Sanskrit word for the beam that latches a traditional gate. Some of these latches were extremely ornate, but the basic purpose and motion resemble the lines of this yoga posture. Imagine the side of your body that remains kneeling as the support structure that adheres to the stable wall; your extended leg is the receiving structure that attaches to the door or gate. The lateral stretch of your torso, working as the “Parigha” or side bar, provides the movement that opens and closes a gateway. In this metaphor, Parighasana becomes a way to meditate upon passages, transitions, openings, and possibilities. Parighasana also reminds us to keep the structural basics in mind, no matter how decorative and impressive modifications may become.
Play with Parighasana or other lateral stretches at our next yoga series, or join our monthly Saturday morning Awaken to Joy – discover the deeper currents within (next is Nov, 1).
Sources:
Faulds, Richard. Kripalu Yoga: A Guide to Practice On and Off the Mat. New York: Bantam Books, 2006, pages 333-335.
“Gate Pose [author unidentified].” Yoga Journal, on-line edition [date modified unknown]. Accessed March 29, 2016. http://www.yogajournal.com/pose/gate-pose/
Iyengar, B.K.S. Light on Yoga. New York: Schocken Books, 1979 (org. 1966), pages 85-87.
Iyengar, Geeta S. “Yoga in Action” for Beginners, Preliminary Course. Mumbai: YOG, 2000, pages 42-44.
Kaminoff, Leslie and Amy Matthews. Yoga Anatomy, second edition. Champaign, Illinois: Human Kinetics, 2012 originally 2007], pages 176-178.

